
Your iPhone 16 captures gorgeous photos straight out of the camera—but what if that “perfect” look isn’t what you want? If your shots consistently appear artificially vibrant, overly sharpened, or unnaturally smooth, you’re experiencing Apple’s Deep Fusion technology in action. This invisible processing pipeline automatically enhances every photo by merging multiple exposures, adjusting colors, and reducing noise. While you can’t completely disable this system on iPhone 16—it’s permanently baked into the hardware—you can significantly reduce its impact using proven workarounds. This guide reveals exactly how to capture more authentic, natural-looking photos by strategically bypassing Apple’s auto-enhance features.
Unlike older iPhone models where you could toggle off Smart HDR, the iPhone 16’s Deep Fusion operates silently and irreversibly. Once you press the shutter, the Neural Engine instantly processes your image through multiple enhancement stages with no option to access the raw sensor data. But don’t settle for artificial-looking photos—by understanding these limitations, you’ll discover practical methods to regain creative control. In this guide, you’ll learn which settings to adjust, when to use specific shooting modes, and which third-party apps completely circumvent Apple’s processing pipeline.
Why Deep Fusion Can’t Be Fully Disabled on iPhone 16
Apple’s Deep Fusion isn’t a simple setting you can toggle—it’s a fundamental hardware-software integration built into the iPhone 16’s imaging pipeline. When you press the shutter, the system simultaneously captures multiple underexposed and overexposed frames, then merges them using the Neural Engine to create what Apple considers the “optimal” image. This process applies automatic brightness adjustments, color saturation boosts, noise reduction, and sharpening that often create an artificial “over-processed” look, especially in challenging lighting.
Crucially, these enhancements happen in real-time with no option to disable them. Unlike iPhone 12 and earlier models where you could turn off Smart HDR, the iPhone 16 series has no such setting—the processing is mandatory. Once applied, the changes are irreversible; there’s no hidden “original” version stored alongside your processed photo. This permanent limitation shapes every workaround strategy, as your goal shifts from “turning off” processing to minimizing or bypassing it.
What Deep Fusion Actually Changes in Your Photos
Understanding exactly what gets altered helps you choose the right workaround. Deep Fusion primarily modifies three elements:
– Dynamic range: Compresses highlights and shadows to prevent blown-out skies or lost details in shadows, often creating an unnatural “HDR glow” effect
– Color science: Boosts saturation and vibrancy, particularly in skin tones and skies, which can make scenes look artificially vivid
– Texture rendering: Applies aggressive noise reduction that smoothes fine details like fabric textures or hair, creating a plastic-like appearance
These changes happen consistently across all lighting conditions—not just in low light. Even daylight portraits can suffer from oversmoothed skin or unnaturally bright greens in landscapes. Recognizing these patterns helps you identify when to deploy specific countermeasures.
Disable HDR Video Processing for Natural-Looking Clips
HDR Video creates that jarringly vibrant look in your clips where colors appear unnaturally punchy and highlights seem artificially glowing. This setting applies heavy tone-mapping across all iPhone 16 models and provides immediate visual improvement when disabled.
How to Turn Off HDR Video
- Open Settings → Navigate to Camera → Select Record Video
- Toggle off “HDR Video” (may appear as “High-Efficiency” depending on iOS version)
Why this works: Disabling HDR Video prevents Dolby Vision processing that compresses dynamic range and oversaturates colors. Your videos will retain natural contrast, especially in mixed-light scenes like sunsets or indoor spaces with windows. The difference is most noticeable in skin tones—which appear more realistic—and in preserving subtle shadow details that HDR often washes out. Note that this only affects video recording; photos still undergo Deep Fusion processing.
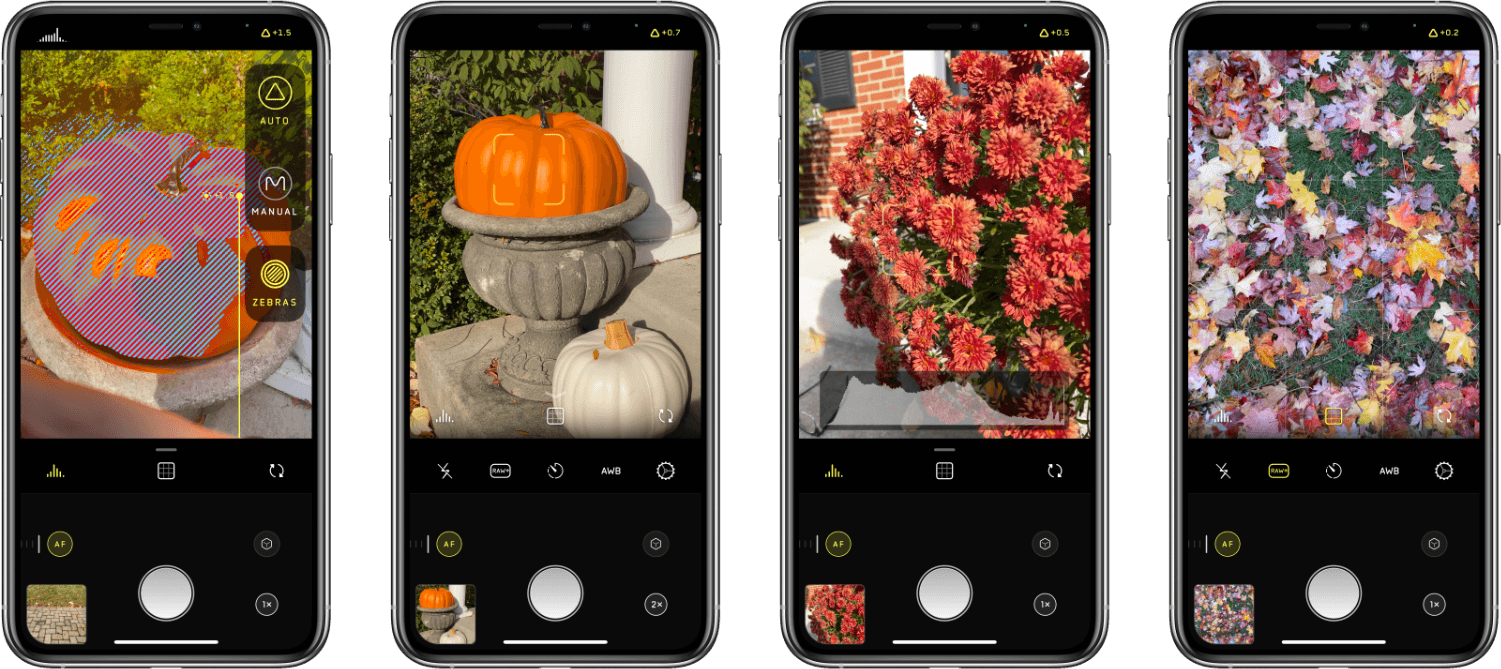
Shoot ProRAW on iPhone 16 Pro Models for Maximum Control
ProRAW captures the sensor’s unprocessed data, bypassing most Deep Fusion steps. Available exclusively on iPhone 16 Pro and Pro Max, this delivers the closest thing to a “raw” iPhone photo with minimal automatic enhancement.
How to Enable and Use ProRAW
- Go to Settings → Camera → Formats
- Enable Apple ProRAW & Resolution Control
- Tap ProRAW Resolution → Select 48 MP for maximum detail retention
- Open Camera → Tap RAW or RAW MAX in the top-right corner before shooting
Critical considerations: Each ProRAW file consumes approximately 75 MB of storage, so manage space carefully. More importantly, these files require manual editing in apps like Photos, Lightroom, or Snapseed to achieve your desired look—they appear flat and desaturated straight out of camera. This isn’t a point-and-shoot solution, but it gives you complete control over brightness, color, and sharpening without Apple’s automatic interventions.
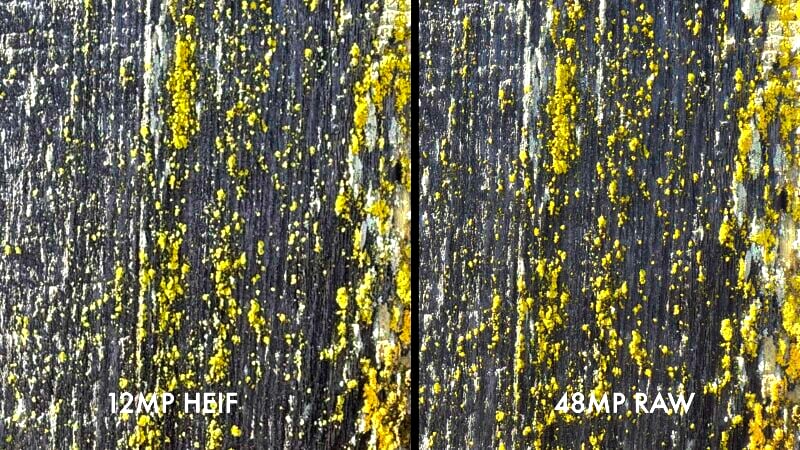
Use 48 MP HEIF Max Mode for Balanced Results
![]()
The iPhone 16’s 48 MP sensor defaults to 24 MP images through pixel-binning. Shooting at full resolution reduces processing intensity since the system skips certain binning algorithms that contribute to the over-processed look.
How to Activate 48 MP HEIF
- Settings → Camera → Formats → Enable Resolution Control
- In the Camera app, select HEIF MAX or 48 MP in the top-right corner before shooting
Why this beats standard mode: While still processed, 48 MP HEIF files undergo less aggressive HDR blending than 24 MP or 12 MP outputs. You’ll notice more natural texture retention in fabrics and landscapes, with reduced “smoothing” artifacts. Files remain manageable at 5-8 MB each—significantly smaller than ProRAW—making this ideal for everyday shooting where you want better quality without massive storage demands.
Disable Night Mode Each Time for Authentic Low-Light Shots
Night Mode creates long exposures with heavy denoising that often produces unnatural results—like smoothed-out grain in dimly lit restaurants or overly bright shadows in nighttime cityscapes.
How to Turn Off Night Mode Per Shot
- In the Camera app, tap the moon icon in the top-left corner
- Slide the timer to Off or simply tap to disable
Important limitation: Night Mode automatically re-enables in low-light conditions. You must disable it every time you want natural low-light photos. The payoff? Shots retain authentic grain structure and realistic shadow falloff rather than the “plastic” smoothness Night Mode often creates. This is particularly valuable for moody indoor scenes where artificial cleanliness ruins the atmosphere.
Leverage Live Photos for Zero-Processed Frames
Live Photos capture 1.5 seconds of motion around your shot, storing individual frames without Deep Fusion processing. You can select any frame as your final image for completely natural results.
How to Capture Unprocessed Shots via Live Photos
- Ensure Live Photo (yellow concentric circles) is enabled in Camera
- Take your shot
- Open the photo in Photos → Tap Edit
- Tap the Live icon → Scrub through frames → Select your preferred frame → Make Key Photo → Done
Why this works: While your main photo undergoes Deep Fusion processing, the individual Live Photo frames remain untouched. Choose a frame from the sequence that best matches your vision—often the first or last frame before motion blur sets in. This method works on all iPhone 16 models and requires no special settings, making it the most accessible way to bypass processing entirely.
Third-Party Camera Apps That Bypass All Processing
External apps completely avoid Apple’s imaging pipeline, including Deep Fusion, Smart HDR, and Night Mode. They access the sensor directly for truly unprocessed captures.
Top Apps for Natural-Looking Photos
- Halide Mark II: Offers manual exposure control, focus peaking, and ProRAW support (Pro models)
- Blackmagic Camera: Provides cinematic flat log profiles that retain maximum dynamic range
- Moment: Delivers professional-grade manual controls and RAW capture
- Obscura: Specializes in precise manual focus and exposure adjustment
How to use: Simply install your chosen app and open it instead of the native Camera. No settings adjustments are needed—these apps capture images without Apple’s automatic enhancements by default. You’ll need to manually adjust exposure and focus, but the payoff is complete creative control over your final image.
Storage-Smart Workflow for Natural Photos
Managing storage is critical when using processing-bypass methods. Here’s how to optimize:
Model-Specific Storage Strategies
| Method | File Size | Storage Tip |
|---|---|---|
| ProRAW 48 MP | ~75 MB | Enable Photos → Optimize iPhone Storage |
| HEIF 48 MP | 5-8 MB | Use weekly iCloud backups to offload originals |
| Burst Mode | Multiple files | Immediately delete unused frames after selection |
| Live Photos | 3-4 MB | Disable in Settings → Camera when not needed |
Pro tip: For ProRAW shooting, connect to Wi-Fi before capturing and enable iCloud Photos → Download and Keep Originals. This automatically offloads massive files to the cloud while keeping optimized versions on your device. On non-Pro models, stick with 48 MP HEIF—it delivers noticeably better results than standard mode with minimal storage impact.
Critical Settings to Disable for Purest Captures
Two often-overlooked settings subtly alter your images through automatic corrections:
Turn Off Lens Correction
- Settings → Camera → Toggle off “Lens Correction”
- Why: Prevents automatic distortion correction that can subtly warp straight lines and alter perspective
Lock Manual Exposure
While framing your shot:
1. Tap-and-hold your subject until AE/AF Lock appears
2. Slide the sun icon to set exposure manually
– Why: Stops the camera from dynamically adjusting exposure as you recompose, which triggers additional processing cycles
iPhone 16 vs Pro Model Limitations
Your specific model determines which workarounds are available:
Standard iPhone 16/16 Plus Owners
- ❌ No ProRAW support—focus on 48 MP HEIF + Live Photo frame selection
- ❌ Cannot disable Smart HDR—it’s permanently automatic
- ✅ All other methods work identically to Pro models
iPhone 16 Pro/Pro Max Owners
- ✅ Full ProRAW capability—your best option for critical shots
- ✅ 48 MP HEIF with enhanced editing flexibility
- ✅ All bypass methods perform optimally
Key insight: Non-Pro users shouldn’t feel limited—48 MP HEIF combined with Live Photo frame selection delivers 90% of ProRAW’s natural look benefits at a fraction of the storage cost. Reserve third-party apps for when you need absolute processing freedom.
Final Recommendations for Natural iPhone 16 Photos
While you can’t flip a switch to “turn off auto enhance iPhone 16” completely, combining these techniques yields dramatically more authentic results. Start with these model-specific approaches:
- For everyday shooting: Enable 48 MP HEIF + Prioritize Faster Shooting (Settings → Camera). This reduces processing intensity while maintaining manageable file sizes.
- For critical low-light shots: Disable Night Mode per shot and use Live Photo frame selection to capture natural grain and shadow detail.
- For maximum control: Pro model owners should shoot ProRAW and edit in Lightroom, while standard model users should adopt third-party apps like Halide.
Remember that Deep Fusion’s processing isn’t inherently bad—it produces consistently shareable photos for most users. But when you crave creative authenticity, these workarounds put you back in control. Experiment with different combinations to find your sweet spot between convenience and image fidelity. Your most natural-looking iPhone 16 photos are just a few settings adjustments away.


