
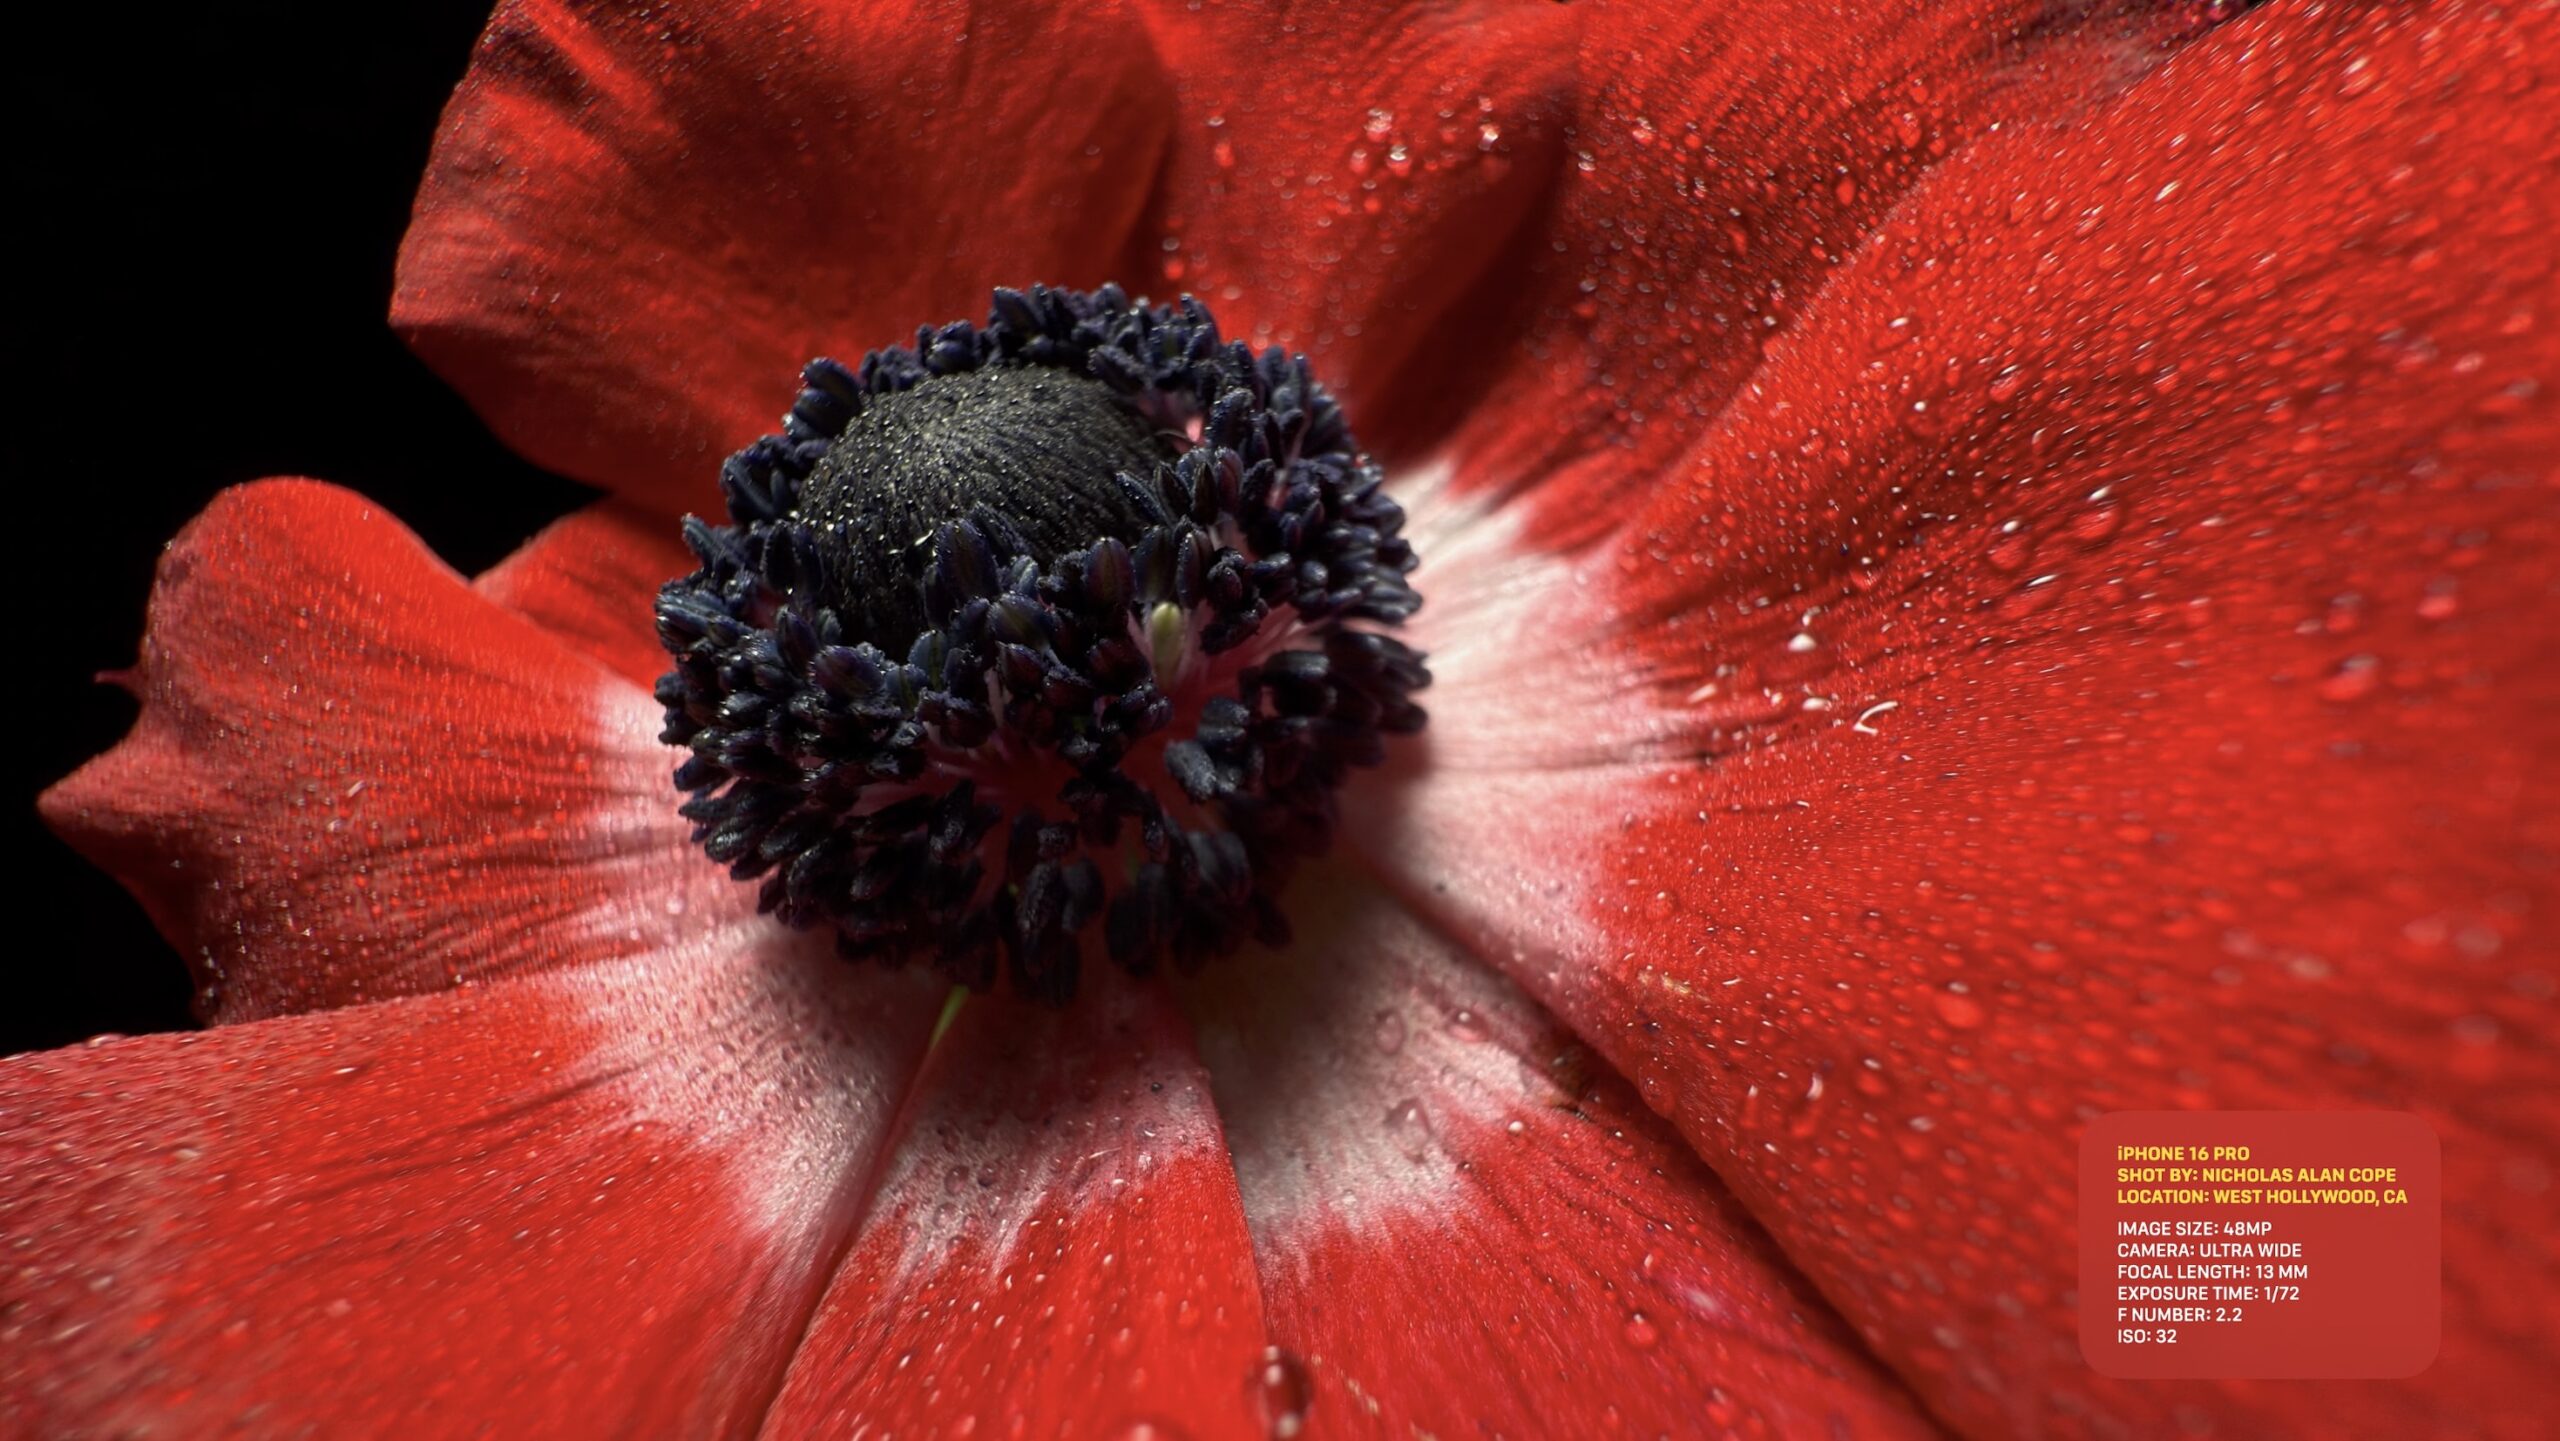
That dewdrop clinging to a spiderweb at dawn or the intricate pattern on a butterfly’s wing—these fleeting microscopic moments used to require bulky DSLR gear. Now your iPhone 16 transforms these details into stunning close-ups without extra lenses. For the first time across Apple’s entire lineup, both standard iPhone 16 models and Pro variants capture razor-sharp macro shots from just 2 centimeters away. This guide cuts through the confusion to show exactly how to trigger macro mode, master manual controls on Pro models, and avoid the #1 mistake that ruins 80% of beginner macro shots. You’ll discover why your camera suddenly switches lenses when you lean in and how to leverage the hidden 48MP ProRAW mode for professional results.
Activate Macro Mode Without Missing Shots
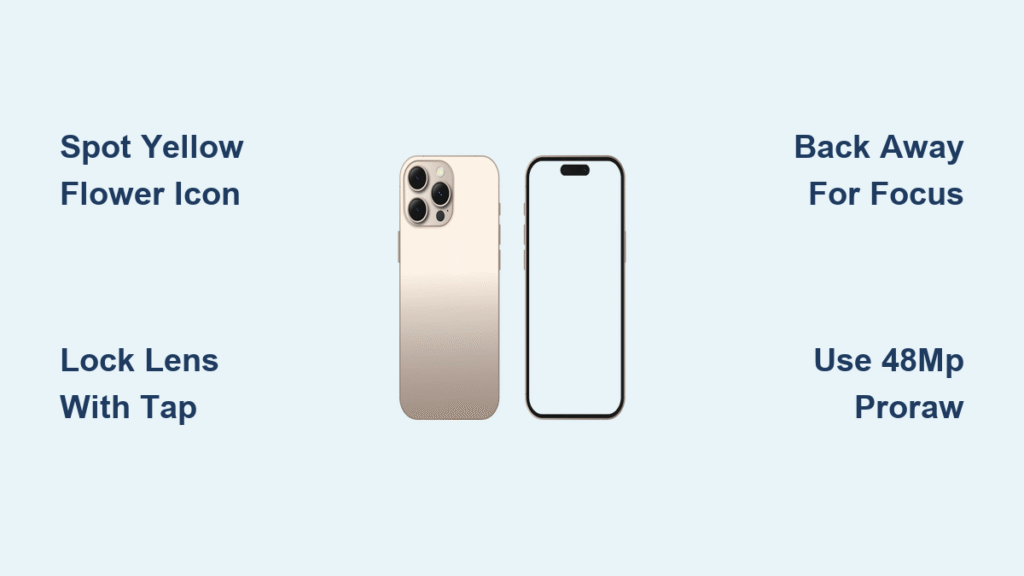
Spot the Yellow Flower Icon Instantly
Your iPhone 16 automatically engages macro mode when you move within 6-7 inches of your subject. Watch the bottom-left corner of your screen for a small yellow flower icon—this signals the Ultra Wide camera has taken over. Unlike previous models restricted to Pro variants, this works identically on iPhone 16, 16 Plus, 16 Pro, and 16 Pro Max. The moment that flower appears, you’re capturing through the 13mm ƒ/2.2 Ultra Wide lens optimized for extreme close-ups. Skip this visual cue and you’ll waste precious seconds wondering why your shot stays blurry when you’re nose-to-nose with a ladybug.
Lock Your Preferred Lens with One Tap
Struggling with unwanted lens switching during important shots? Disable automatic transitions in two ways:
– Quick session fix: Tap the yellow flower icon during shooting to lock your current lens
– Permanent solution: Go to Settings → Camera → toggle off Macro Control
Critical pro tip: Enable Preserve Settings → Macro Control if you frequently shoot macro. This remembers your preference between sessions—otherwise, your iPhone resets to default automatic switching after closing the Camera app. Wedding photographers shooting close-up ring details or food bloggers capturing sprinkled spices will thank you for this time-saver.
Capture Blurry-Free Macro Photos Every Time
Perfect Your 12MP Auto Macro Technique
Most users fail macro shots by getting too close initially. Follow this foolproof sequence:
1. Open Camera in Photo mode (no special settings needed)
2. Start at 2cm distance from your subject—literally touching the lens cover
3. Slowly pull back until the yellow flower icon appears (around 6 inches)
4. Tap your subject on screen to manually focus if edges look soft
5. Press the shutter with a gentle squeeze to avoid shake
Why this works: The Ultra Wide camera needs minimum distance to focus. Starting at 2cm then backing up triggers the system correctly. Forced close-ups without the flower icon default to digital zoom—guaranteeing muddy results. Expect vibrant 12MP shots perfect for Instagram, typically 2-3MB files.
Unlock 48MP ProRAW Macro (Pro Models Only)
For scientific documentation or large-format prints, leverage the Pro’s secret weapon:
1. Prep your phone: Settings → Camera → Formats → enable ProRAW & Resolution Control
2. Open Camera app → tap HEIF Max (4.5MB files) or RAW Max (75MB files) at top
3. Manually select 0.5x zoom—don’t rely on auto-switching
4. Position subject at 2cm distance and shoot
Reality check: While 48MP captures microscopic texture, Auto Macro’s computational photography often produces better-looking 12MP shots for social media. Reserve 48MP for when you need extreme cropping flexibility in post-production.
Record Cinematic Macro Videos Without Shakes
Shoot Macro Video in Any Mode
Forget switching to dedicated video modes—hold the shutter button in Photo mode to instantly record macro video. This works in Portrait mode too, preserving background blur effects. The yellow flower icon confirms macro activation during recording. For shaky handheld shots, brace your elbows against your chest and exhale while pressing record. Even minor movements magnify dramatically at 2cm distances.
Stabilize Pro-Level Macro Footage
Achieve studio-quality macro videos with these field-tested methods:
– Tripod essential: Use a tabletop tripod ($15 on Amazon) to eliminate handshake
– Lighting hack: Position a window to your left/right—never shoot with direct front light that creates flat, shadowless images
– Audio note: Built-in mics pick up handling noise; use external wireless mics for nature documentaries
Pro move: In Slo-mo mode, tap .5x before approaching your subject. This locks the Ultra Wide lens for buttery slow-motion macro of falling raindrops or insect wings.
Solve 3 Critical Macro Mistakes Immediately

Fix “Too Close” Blurry Shots in 5 Seconds
When your subject looks like a watercolor painting:
1. Don’t panic—this means you’re inside the 2cm minimum focus distance
2. Slowly increase distance while watching your subject through the viewfinder
3. Stop moving the instant edges snap into focus (usually 3-4cm out)
Warning: Forcing focus by tapping the screen won’t fix this physical limitation. The flower icon won’t appear if you’re too close—use it as your distance meter.
Stop Unwanted Lens Switching During Action Shots
Photographing a bee on a flower? Sudden lens jumps ruin the moment. Permanent fix:
– Settings → Camera → toggle on Macro Control
– Now the flower icon appears only when you want macro
– Tap it to manually activate/deactivate mid-shoot
Without this, your iPhone may switch to the main camera when the bee flies slightly farther away—losing your macro composition.
Avoid the Digital Zoom Trap
Many users instinctively zoom to 2x or 5x in macro mode, not realizing:
– 2x zoom: Crops the 12MP image by 70%, creating noticeably softer results
– 5x zoom: Uses heavy computational extrapolation—output resembles a pixelated mess
Better solution: Shoot at 1x with Auto Macro, then crop in Photos app later. For true optical zoom close-ups, back away until the flower icon disappears, then use 5x Telephoto mode to capture subjects with creamy background blur.
Maximize Quality with Pro Lighting Techniques
Counteract Your iPhone’s Shadow
Your phone blocks ambient light when hovering 2cm above subjects. Fix this with:
– Pocket flashlight: Shine from 45° above at half-brightness (prevents harsh reflections)
– White paper reflector: Tape printer paper to a chopstick to bounce light under petals
– Golden hour advantage: Shoot outdoor macro between 9-11 AM when light is soft and directional
Never use built-in flash—it creates blown-out highlights and eliminates dimensionality on tiny subjects.
Verify Your 48MP Macro Shots
After capturing, confirm you got true high-res macro:
1. Open Photos → select your image
2. Swipe up to reveal metadata
3. Check for 8000 x 6000 pixels (48MP) or HEIF Max/ProRAW Max tags
If you see 4032 x 3024, you shot in standard 12MP mode—perfectly fine for most uses but lacking editing flexibility.
Third-Party Lens Workarounds That Actually Work
Defeat Automatic Lens Detection
Attaching clip-on macro lenses triggers iPhone’s lens-switching algorithm. Bypass it:
1. Enable Macro Control in Settings → Camera first
2. Attach your lens (Moment, Sandmarc, etc.)
3. Open Camera → tap the yellow flower icon to force Ultra Wide usage
This tells your iPhone: “Ignore external hardware—use the native macro system.” Without this step, your phone defaults to main camera mode, defeating the purpose of your add-on lens.
Quick Reference Cheat Sheet
Emergency Macro Setup (Under 10 Seconds)
- Standard models: Open Camera → move to 6″ distance → shoot when flower appears
- Pro models: Toggle HEIF Max → .5x zoom → shoot at 2cm
When to Use Which Mode
- Auto 12MP: 95% of scenarios (social media, quick captures)
- Manual 48MP: Only when you need extreme cropping (scientific imaging, large prints)
- 5x Telephoto: For non-macro close-ups of small subjects (like jewelry)
Must-Enable Settings
- Preserve Settings → Macro Control (saves your preferences)
- ProRAW & Resolution Control (Pro models for 48MP)
Your iPhone 16 turns microscopic wonders into shareable art without carrying extra gear. Start with Auto Macro mode—just get close enough for that yellow flower icon and shoot. Within minutes, you’ll capture details invisible to the naked eye: pollen grains on a bee’s leg, fabric weaves in vintage denim, or ice crystals on a winter window. Pro users should experiment with 48MP mode for its editing flexibility, but remember that computational photography often makes standard 12MP shots more vibrant. The next time you see a dewdrop on a leaf, don’t just admire it—pull out your iPhone 16, watch for the flower icon, and immortalize nature’s hidden masterpieces. Within a week of practicing these techniques, you’ll never see ordinary objects the same way again.


