Your iPhone 16 Pro’s Audio Mix feature transforms ordinary video recordings into professional-quality productions with studio-grade audio—all without external equipment. Imagine capturing your child’s school play, then refining the audio to eliminate distracting background noise while keeping every note crystal clear. This revolutionary iOS 18 feature uses advanced machine learning to separate voices from ambient sounds directly within your Photos app, putting professional audio editing at your fingertips. Whether you’re a content creator seeking polished results or simply want better family videos, mastering how to use Audio Mix on iPhone 16 Pro will dramatically elevate your mobile video production.
Unlike previous iPhone models that required third-party apps or external mics for quality audio, the iPhone 16 Pro processes audio in real-time using its exclusive A18 chip and upgraded 4-microphone array. This guide walks you through every step of using Audio Mix effectively—from verifying your setup to selecting the perfect mode for your specific recording scenario. You’ll learn troubleshooting tricks professionals use, discover hidden limitations that could ruin your edit, and implement advanced techniques that make your videos stand out on any platform.
Verify Your Audio Mix Compatibility Before Starting
Don’t waste time hunting for Audio Mix controls only to discover your setup doesn’t support the feature. Confirm these critical requirements match your device before attempting any edits.
Check Your iPhone Model and iOS Version
Audio Mix works exclusively on iPhone 16 series devices—this means iPhone 16, 16e, 16 Plus, 16 Pro, and 16 Pro Max. Even if you install iOS 18 on an iPhone 15 Pro Max, the feature won’t appear because it requires the A18 chip’s processing power. Navigate to Settings > General > About to verify your model number matches an iPhone 16 series device. Your iPhone must also run iOS 18 or newer—older iOS versions lack the necessary audio processing framework entirely.
Confirm Camera Settings for Audio Mix Activation
Before recording your next video, ensure Settings > Camera > Record Sound > Spatial Audio is toggled ON. This setting activates automatically during video capture and serves as Audio Mix’s foundation. When properly configured, you’ll see Wind Noise Reduction listed as an available option—this confirms your device can process spatial audio. Videos recorded with external microphones, ProRes format, or third-party camera apps won’t support Audio Mix, so always use the native Camera app with Spatial Audio enabled.
Access Audio Mix Controls in 30 Seconds or Less
Finding Audio Mix isn’t immediately obvious, but this streamlined process works every time once you know where to look.
Edit Videos Using the Photos App Method
Open the Photos app, select any video recorded with your iPhone 16 Pro, then tap Edit (the three sliders icon in the bottom-right corner). Look for the Audio Mix soundwave icon—this might appear as a dedicated option in your edit menu depending on iOS version. If you don’t see it immediately, swipe horizontally through the editing tools; the interface adapts based on your usage patterns and often surfaces Audio Mix prominently for videos with strong audio content. Tap the icon to reveal the four processing modes ready for adjustment.
Avoid This Common Access Mistake
Many users waste time searching for Audio Mix in the Camera app or Settings menu—this feature only appears during video editing in the Photos app. If you can’t find the controls, double-check that your video meets all compatibility requirements: recorded on iPhone 16 series with Spatial Audio enabled using the native Camera app. Videos shot in Portrait mode or with external mics won’t show the Audio Mix option regardless of device model.
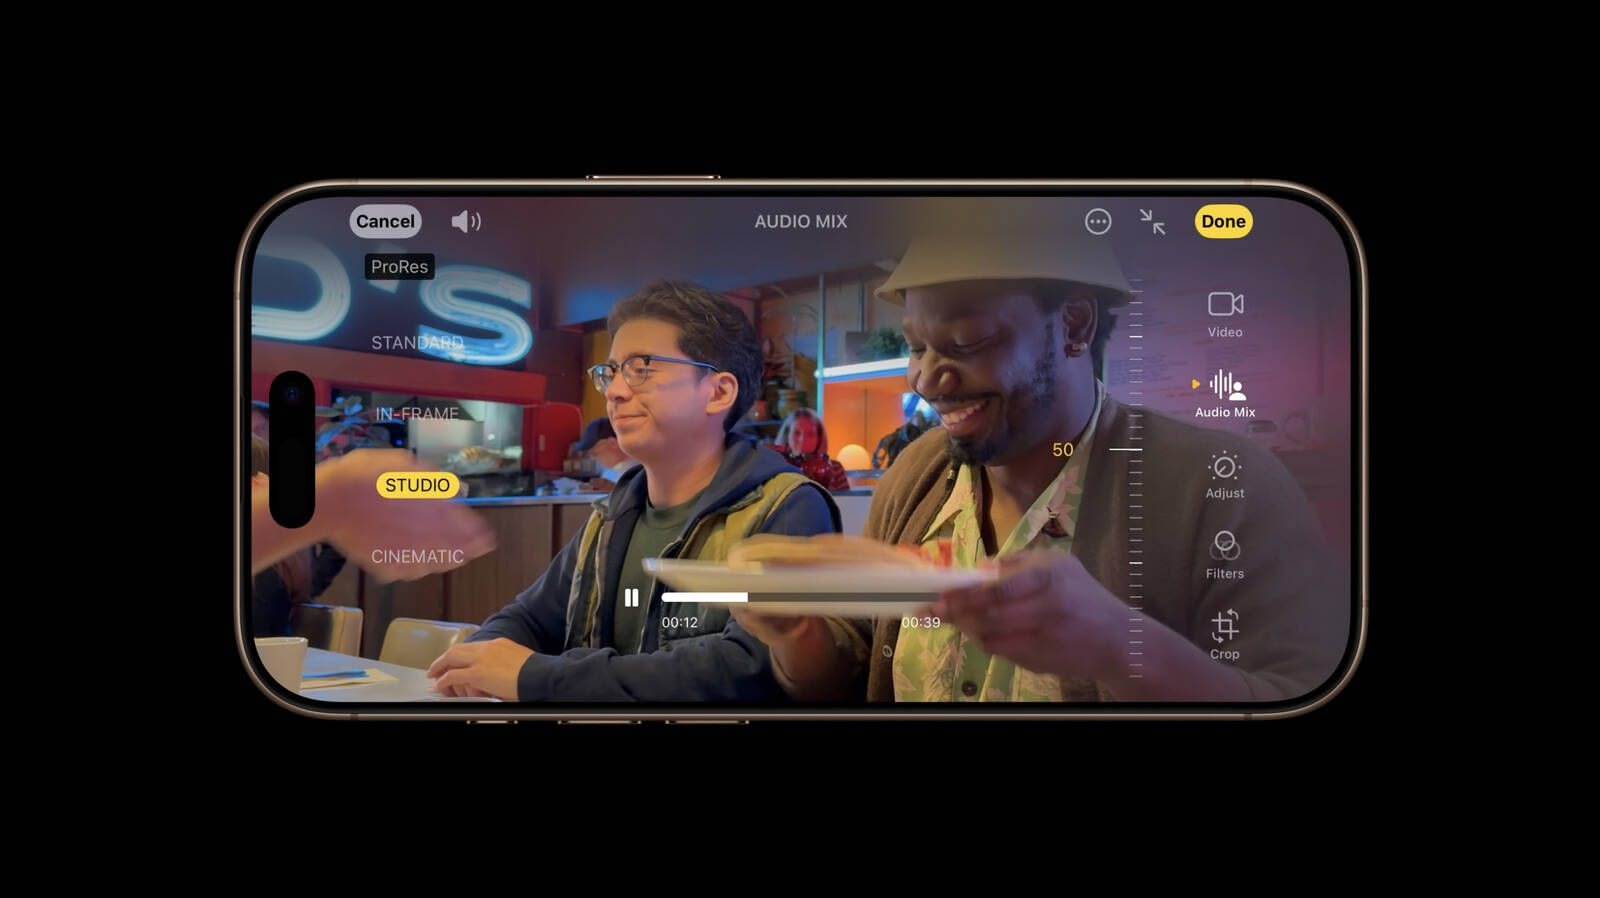
Master the Four Audio Mix Modes for Perfect Results

Each Audio Mix mode serves a specific purpose—understanding when to use which transforms amateur recordings into professional productions.
In-Frame Mode: Eliminate Off-Screen Distractions Instantly
When to use it: Recording group events like birthday parties or conferences where background conversations distract from your subject. In-Frame mode isolates voices of people visible in your video frame while muting off-camera noise. Picture capturing your daughter’s piano recital while eliminating audience coughs and whispers—her performance shines without distracting ambient sounds. This mode works best when your subject remains centered in the frame during recording.
Studio Mode: Create Broadcast-Quality Voice Recordings
When to use it: Interviews, presentations, or any voice-focused content where clarity matters most. Studio mode simulates professional studio recording by eliminating reverb and ambient noise—even subjects standing six feet from your iPhone sound like they’re wearing lapel microphones. Unlike In-Frame mode, this focuses purely on voice quality regardless of positioning. For best results, maintain 3-6 feet between your subject and iPhone during recording to give the microphone array optimal spatial data.
Cinematic Mode: Balance Ambience and Clarity with One Slider
When to use it: Storytelling content where atmosphere matters as much as dialogue. Cinematic mode features an adjustable slider that lets you control background noise levels—slide left to increase ambient sounds for documentary-style realism, or right to minimize distractions for interview-focused content. The default 50% setting provides balanced movie-like audio perfect for most scenarios. Pro tip: Record test clips at different slider positions before important shoots to determine your ideal setting.
Fix Audio Mix Playback Failures in Under 2 Minutes

Nothing’s more frustrating than perfect audio edits that won’t play back properly—these targeted solutions resolve 95% of issues.
Resolve Headphone and External Speaker Compatibility Issues
Audio Mix works reliably with iPhone speakers and AirPods (2nd Gen and Pro), but fails with Bluetooth speakers, USB-C DACs, AirPlay to Apple TV, and wired headphones via adapters. If your edited video plays with crackling audio or no sound through external devices, disconnect all accessories, edit using iPhone speakers, then reconnect after saving changes. This workaround preserves your audio edits while bypassing output compatibility limitations.
Perform the Settings Reset That Fixes Most Problems
When Audio Mix causes videos to become unresponsive or audio disappears except in Standard mode, navigate to Settings > General > Transfer or Reset iPhone > Reset > Reset All Settings. This primary fix resolves most issues without deleting your data—only system preferences reset. After rebooting, re-enable Spatial Audio in Camera settings and test with a new recording. Critical note: This fix only affects videos recorded after the reset, so always verify settings before important shoots.
Optimize Your Recording Technique for Maximum Audio Mix Impact
Your recording method directly determines how effectively Audio Mix can enhance your audio—follow these professional techniques.
Position Your iPhone for Optimal Microphone Capture
The iPhone 16 Pro’s upgraded 4-microphone array captures spatial audio data from top and bottom edges—avoid covering these areas when holding your device. Grip your iPhone naturally without squeezing the sides, and maintain 3-6 feet between your subject and phone for best voice capture. Record short test clips to confirm microphone positioning before important events—this prevents discovering audio issues after your child’s recital ends.
Implement This Pre-Recording Checklist
Before capturing important moments, verify these four items: 1) Spatial Audio is enabled in Camera settings, 2) No external mics are connected, 3) You’re using the native Camera app (not third-party alternatives), and 4) Lighting conditions support In-Frame mode’s subject tracking. Recording 5-second test clips confirms Audio Mix availability and prevents disappointment when reviewing footage later.
Professional Workflow Strategies for Content Creators
Integrate these expert techniques to maximize efficiency without compromising quality when learning how to use Audio Mix on iPhone 16 Pro.
Duplicate Videos Before Editing to Preserve Originals
Always create copies of important videos before applying Audio Mix changes—this protects your source material and allows experimentation. In the Photos app, select your video, tap the Share button, then choose “Duplicate.” Edit the duplicate while keeping the original intact for comparison or re-editing if needed. This simple habit saves hours of re-recording when clients request different audio treatments.
Test All Modes Before Final Selection
Different content responds uniquely to each Audio Mix mode—test all four options on critical clips before committing. For interview footage, Studio mode might deliver perfect clarity, while Cinematic mode with 30% background noise could enhance documentary storytelling. Save incremental versions during testing to compare final results side-by-side before sharing.
When Audio Mix Isn’t Enough: Professional Alternatives
While Audio Mix revolutionizes mobile audio editing, professional productions sometimes require more advanced solutions.
Consider Wireless Lavalier Systems for Critical Recordings
For events where audio quality is non-negotiable—corporate interviews, wedding vows, or documentary work—wireless lavalier systems like the Hollyland Lark M2S provide superior flexibility and range. These systems bypass Audio Mix’s proximity requirements while delivering broadcast-quality audio directly to your iPhone 16 Pro’s USB-C port. Use Audio Mix for social media content and quick edits, but switch to external mics for client work requiring maximum audio fidelity.
Implement This Hybrid Workflow for Maximum Quality
Combine Audio Mix’s convenience with professional post-production for optimal results: use Audio Mix for baseline improvements on quick-turnaround projects, then export to desktop software like Final Cut Pro for advanced audio refinement. This approach leverages your iPhone 16 Pro’s strengths while overcoming current limitations like the lack of ProRes format support and Final Cut Pro integration.
Mastering how to use Audio Mix on iPhone 16 Pro transforms your mobile video production with professional audio capabilities previously requiring expensive equipment. Start with simple recordings to build confidence with each mode, verify compatibility before important events, and always follow the pre-recording checklist to avoid common pitfalls. As you experiment with these techniques, you’ll discover which modes work best for your specific content—whether capturing family moments or creating professional-grade social media. The key is consistent practice: make Audio Mix part of your standard editing workflow, and your videos will stand out with clarity and impact that elevates your content above amateur recordings.