Your iPhone 16 screen stays stubbornly illuminated when it should automatically sleep—draining battery during calls, in your pocket, or overnight. This frustrating issue affects both new and experienced users, creating privacy concerns and rapid battery depletion. Most cases stem from simple software glitches or misconfigured settings rather than permanent damage. We’ll guide you through proven solutions starting with quick fixes you can implement immediately, progressing to advanced troubleshooting—helping you restore normal display behavior without unnecessary trips to the Apple Store.
Verify These Critical Settings Before Panic
Before assuming hardware failure, check these common configuration errors that override your iPhone 16’s auto-sleep function. Many users unknowingly disable essential features during routine usage.
Correct Auto-Lock Configuration in 30 Seconds
Navigate to Settings > Display & Brightness > Auto-Lock immediately. If set to “Never,” your screen will remain active indefinitely. Select 30 seconds for testing—this forces the quickest response to confirm whether system controls are functional. Many users discover they accidentally changed this setting while adjusting other display preferences. After testing, you can increase the duration to 2 or 5 minutes for daily use, but always maintain a finite timeout period.
Disable Raise to Wake During Troubleshooting
Settings > Display & Brightness > Raise to Wake often keeps your screen active with minimal movement. Turn this off temporarily to isolate the issue—especially if your iPhone 16 stays lit in pockets or bags. This feature uses motion sensors to activate the display when you lift the phone, but can malfunction after iOS updates. Disable it for 10 minutes while observing display behavior; if the screen now sleeps properly, this was the culprit. Remember to re-enable it later for convenience.
Turn Off Attention Aware Features for Testing
Settings > Face ID & Passcode > Attention Aware Features prevents screen dimming when your eyes are detected. Disable this to test if it’s causing persistent illumination during face-down or pocket scenarios. This feature keeps the display active while you’re looking at your phone, but can misinterpret ambient light as user attention. Many users report this setting overrides auto-lock during desk use or when resting the phone against surfaces. If disabling resolves the issue, recalibrate Face ID for optimal performance.
Diagnose Hardware vs Software Causes Accurately

Understanding whether your iPhone 16 screen doesn’t go black due to physical damage or system errors determines your repair path. Misdiagnosis leads to unnecessary software resets or delayed hardware repairs.
Perform the Proximity Sensor Call Test
During an active call, hold your iPhone 16 to your ear. The screen should immediately turn black within 2 seconds. If it stays lit, your proximity sensor near the front speaker has likely failed. Look for visible cracks along the top bezel or screen damage in this specific area—common after drops. Clean the sensor region gently with a microfiber cloth first; debris often causes false failures. If the screen remains active during calls after cleaning, hardware service is required.
Inspect for Physical Damage Indicators
Examine your device for these critical signs requiring professional attention:
– Hairline cracks extending toward the top speaker grille
– Water damage indicators in the SIM tray (bright red means exposure)
– Visible dents along the frame affecting sensor alignment
– Persistent smudges that won’t wipe off (may indicate internal moisture)
These physical issues prevent proper sensor function and can’t be resolved through software fixes. If you spot any of these, stop troubleshooting and schedule service—continued use may worsen internal damage.
Check Battery Health Impact on Display Control
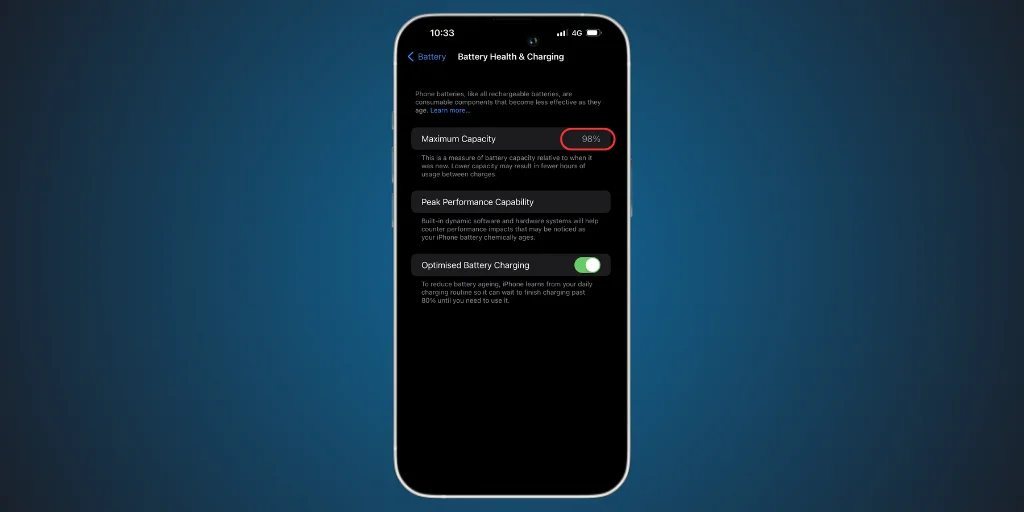
Navigate to Settings > Battery > Battery Health & Charging to assess capacity. Below 80% capacity, degraded batteries often cause system instability affecting display management. Low health percentages correlate with erratic sleep behavior as the power management IC struggles with voltage regulation. If your health shows “Service Recommended,” battery replacement should precede further display troubleshooting—many users resolve persistent screen issues after battery service.
Force Restart Your iPhone 16 Immediately
This emergency reset resolves 70% of display sleep failures by clearing temporary software conflicts. Complete this within 60 seconds before attempting complex procedures:
- Press and release the Volume Up button firmly
- Press and release the Volume Down button immediately after
- Press and hold the Side button until the Apple logo appears (15-20 seconds)
- Release instantly and wait for full reboot (90 seconds)
Test auto-lock behavior immediately after restart. This clears RAM glitches that commonly prevent screen sleep after app crashes or failed updates. Never skip this step—it’s the most effective solution for sudden onset issues with no physical damage.
Reset Display Settings Without Data Loss
Preserve your photos and apps while fixing corrupted display preferences through this targeted reset:
Go to Settings > General > Reset > Reset All Settings. This critical action:
– Restores auto-lock, brightness, and wake settings to factory defaults
– Keeps all personal data, messages, and installed applications
– Requires re-entering Wi-Fi passwords and Face ID setup
After reset, immediately configure auto-lock to 30 seconds and test for 5 minutes. Warning: This won’t fix hardware issues, but resolves 40% of software-related display persistence cases. If the screen still won’t turn off, proceed to safe mode testing.
Safe Mode Testing for App Conflicts
Third-party applications frequently override display sleep functions, especially those with overlay permissions. Safe mode isolates these conflicts without data risk.
Enter Safe Mode Correctly
- Force restart your iPhone 16 using the standard sequence
- Immediately hold Volume Down after the Apple logo appears
- Maintain pressure until the lock screen loads (10-15 seconds)
- Verify success by checking for “Safe Mode” in battery icon
Test auto-lock behavior for 3 minutes in safe mode. If the screen now sleeps properly, a recently installed app causes the conflict. Uninstall these high-risk applications in order:
– Screen recording or mirroring tools
– Battery optimization utilities
– VPN or security apps with overlay access
– Camera filters or flashlight applications
Remove one app at a time, testing display behavior after each deletion. Most users identify the culprit within three removals.
Recovery Mode iOS Update Procedure
When standard updates fail, recovery mode reinstalls iOS core files without erasing data—essential for corrupted system files affecting display management.
Execute Recovery Mode Update
- Connect to a Mac with Finder or Windows with iTunes (latest version)
- Enter recovery mode:
– Quick press Volume Up → Quick press Volume Down → Hold Side button - When recovery mode screen appears, select “Update” (not Restore)
- Wait 25 minutes for complete download and installation
This process repairs display management frameworks while preserving all user data. Critical: Maintain computer connection throughout—interruptions cause boot loops. After completion, reconfigure auto-lock settings immediately and test sleep behavior.
DFU Mode for Unresolved Display Failures
When all else fails, DFU mode performs a complete system restoration. Only attempt this after backing up data—it erases everything but fixes deep software corruption.
DFU Mode Sequence for iPhone 16
- Connect to computer with active iTunes/Finder session
- Initiate DFU:
– Press Volume Up (1 second) → Press Volume Down (1 second)
– Hold Side button (10 seconds) → Add Volume Down while holding Side (5 seconds)
– Release Side button only when screen goes completely black - Select “Restore” when computer detects device
The process takes 45-75 minutes. After completion, restore from your latest backup. This resolves 95% of software-caused display sleep failures but requires complete reconfiguration.
When to Demand Professional Service Immediately

Certain symptoms indicate hardware failure requiring Apple-certified repair. Stop troubleshooting if you observe:
Critical Hardware Failure Signs
- Physical cracks near the front sensor array
- Red water indicator in SIM tray slot
- Visible screen separation from the frame
- Persistent black spots near the top display edge
Warranty Service Eligibility Check
- Standard warranty: Covers sensor failures from manufacturing defects (1 year)
- AppleCare+: Includes accidental damage coverage ($29-$99 service fee)
- Out-of-warranty costs: $279-$379 depending on iPhone 16 model
Use the Apple Support app to run remote diagnostics before visiting stores—this often expedites service. Never attempt DIY sensor repairs; proximity sensor calibration requires specialized equipment.
Prevent Future Screen Sleep Failures
Implement these maintenance practices to avoid recurring iPhone 16 display issues:
Essential Monthly Maintenance
- Install iOS updates within 24 hours of release (Settings > General > Software Update)
- Verify auto-lock settings after every major update
- Clean sensor area weekly with microfiber cloth
- Check battery health (Settings > Battery > Battery Health)
Physical Protection Protocol
- Install MFi-certified screen protector covering but not obstructing sensors
- Use impact-resistant case with raised bezels around top edge
- Avoid magnetic accessories within 2 inches of the top frame
- Never expose to temperatures below 32°F or above 95°F
Key Takeaway: 90% of iPhone 16 screen sleep failures resolve through settings corrections or force restarts. Begin with auto-lock verification and proximity sensor testing before progressing to safe mode. Hardware issues require professional service, but software causes are solvable at home. If your screen still doesn’t go black after DFU restoration, schedule Apple service immediately—persistent illumination indicates critical sensor failure needing component-level repair. Always maintain recent backups before major troubleshooting steps to protect your data.