Your iPhone 16 call suddenly sounds like you’re talking through a pillow, or Zoom meetings keep muting you mid-sentence. Before assuming hardware failure, understand this critical fact: there’s no master “microphone off” switch on your iPhone 16. What feels like a “turned off” mic is almost always a physical blockage, misconfigured app permission, or software glitch – all fixable in under 10 minutes. This guide cuts through the confusion with iPhone 16-specific solutions, tested across all three microphones. You’ll learn exactly where to clean, which settings to tweak for TikTok or FaceTime, and when to skip DIY fixes for Apple service.
Most users waste hours rebooting or reinstalling apps without checking the real culprit: lint clogging the bottom microphone grille. With the iPhone 16’s triple-mic system (bottom, front, and rear), a single blocked port can cripple speakerphone or video calls while leaving regular calls functional. Follow this sequence to pinpoint and solve your issue – no technical expertise needed.
Remove Case and Screen Protector Blockages First
Inspect All Three Microphone Locations
Your iPhone 16 has microphones in three critical zones, each serving distinct functions that third-party accessories often obstruct. The bottom mic (near the charging port) handles standard calls and Voice Memos. The front mic (above the display) manages speakerphone and selfie videos. The rear mic (near the camera bump) captures audio for rear-camera recordings and noise cancellation. 90% of “dead mic” reports stem from cases or screen protectors overlapping these ports.
Start by removing every accessory: peel off screen protectors (even “precise-cut” ones), detach magnetic mounts, and slide out of cases. Hold your iPhone 16 at eye level under bright light. The bottom mic grille appears as a tiny black mesh strip left of the speaker. The front mic is a nearly invisible pinhole above the front camera. The rear mic sits as a small circular mesh near the camera sensors. If you see plastic film, case material, or debris covering any opening, that’s your problem.
Quick Debris Removal Without Damage
Never insert metal objects into mic holes – the iPhone 16’s internal components are fragile. Instead, power off your device completely (hold side + volume up buttons until Apple logo appears). Use a soft-bristled toothbrush with dry, gentle strokes over each port. For stubborn lint, hold a can of compressed air upright 6 inches away and use one-second bursts. Critical warning: Tilting the air can sprays liquid propellant that permanently damages microphones. If debris persists, try a wooden toothpick’s flat edge (never the sharp tip) to nudge fibers sideways – never downward.
Test Bottom Microphone with Voice Memos
Diagnose Call Audio Failures
When voices sound muffled during regular calls, the bottom microphone is compromised. The Voice Memos app is your diagnostic gold standard because it isolates this specific mic. Open the app, tap the red record button, and speak normally into the bottom edge of your iPhone 16 (not the speaker grille). Record 10 seconds, stop, then play back immediately. Clear audio confirms hardware functionality; distortion or silence indicates blockage or failure.
If playback reveals no sound, don’t panic. First, check volume settings during playback – muted media volume mimics mic failure. Retry the test without any case or screen protector. If still silent, force restart your iPhone 16: press and release volume up, press and release volume down, then hold the side button until the Apple logo appears (about 15 seconds). This clears temporary software freezes affecting audio routing.
Troubleshoot Persistent Voice Memo Failures
When Voice Memos remain silent after restarts, escalate methodically:
1. Test with headphones: Plug in wired earbuds with a mic. If calls work, your iPhone’s internal mic has physical damage.
2. Check for water damage: Inspect the charging port for red liquid contact indicators (LCIs). Water exposure requires professional service.
3. Isolate the scenario: Try a FaceTime audio call. If it works while cellular calls fail, contact your carrier – the issue isn’t your device.
Verify Speakerphone Microphone with Camera App
Identify Front Microphone Issues
Muffled speakerphone calls or distorted selfie videos point to the top-front microphone. Diagnose it by opening the Camera app, switching to video mode, and recording 10 seconds while speaking directly toward the top edge of your screen. Play back the clip – your voice should be crisp. Then tap the camera flip icon, record another clip speaking toward the top edge, and compare audio. If front-camera audio is weaker than rear-camera audio, the front microphone is blocked or faulty.
This test works because rear-camera video uses the bottom mic, while front-camera video uses the top-front mic. Don’t mistake low volume for failure – the front mic is designed to capture ambient noise, so your voice may sound slightly quieter than in Voice Memos. If both videos have poor audio, the issue likely affects the bottom mic (used for rear video), not the front.
Fix App-Specific Microphone Denials
Grant Missing Permissions Immediately
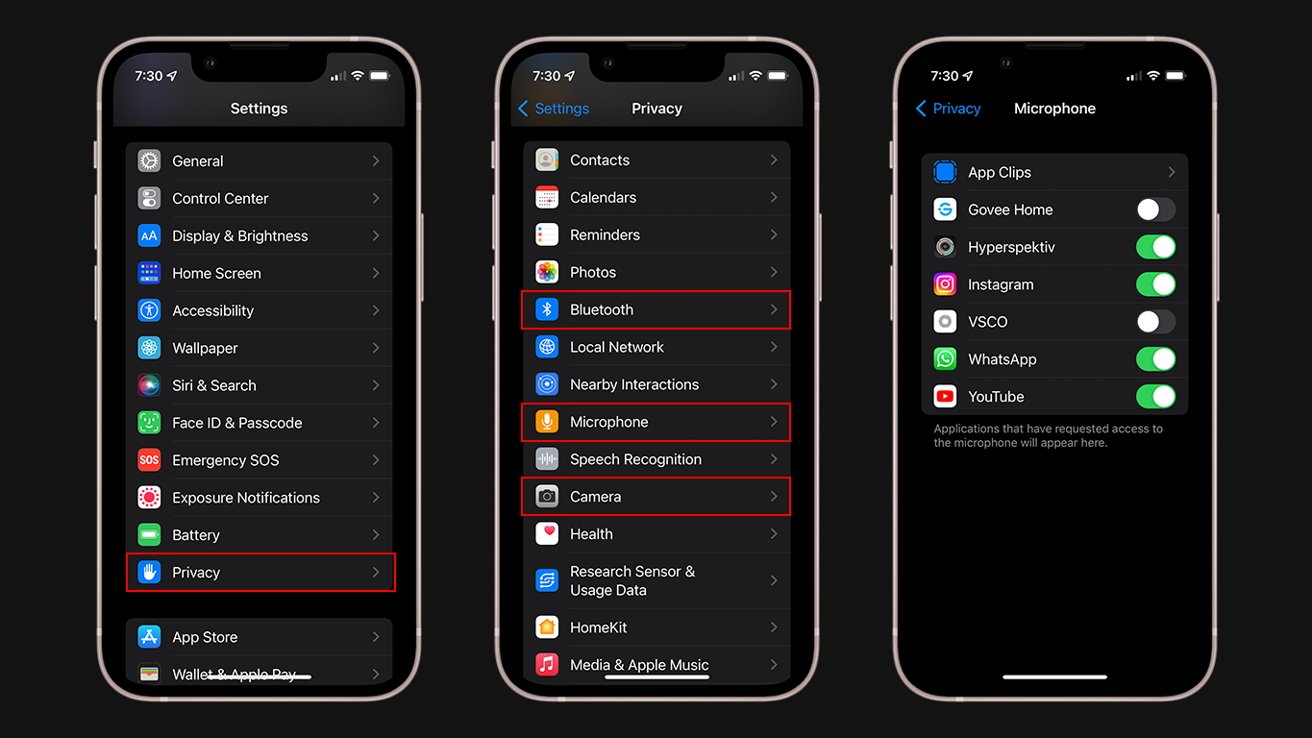
When only one app (like WhatsApp or Instagram) can’t access your microphone, permissions are blocked. Go to Settings > Privacy & Security > Microphone. Scroll to find the problematic app – its toggle should be green. If gray, tap it to enable access. Crucially: Force-close the app after changing permissions (swipe up from bottom, pause, then swipe the app away) to reset its audio connection.
Some apps skip the permission prompt if denied previously. To trigger it:
1. Open the app and navigate to its voice-record feature (e.g., Instagram Stories microphone icon)
2. When prompted, select “Allow” or “Change to Allow”
3. If no prompt appears, toggle Airplane Mode on/off to refresh system services
Handle Missing Apps in Microphone Settings
If your app doesn’t appear in the Microphone settings list:
– Update iOS first: Go to Settings > General > Software Update. Outdated iOS versions sometimes hide app permissions.
– Reinstall the app: Long-press the app icon > Remove App > Reinstall from App Store. This resets permission flags.
– Check app-specific settings: Some apps (like Zoom) have internal mic toggles under Settings > Audio.
Never grant microphone access to apps that don’t need it – this is a privacy risk. If “Microphone” permissions are grayed out and unchangeable, your Screen Time restrictions are blocking access (Settings > Screen Time > Content & Privacy Restrictions > Microphone).
Reset Microphone Settings Without Data Loss

Execute a Targeted Reset
When multiple apps fail despite correct permissions, corrupted audio settings are likely. Navigate to Settings > General > Transfer or Reset iPhone > Reset > Reset All Settings. This clears network configurations, keyboard dictionaries, and crucially, microphone routing preferences – without deleting photos, messages, or accounts. Enter your passcode when prompted, then wait for the restart.
Critical preparation: Have your Wi-Fi password ready (this reset forgets networks), and disable “Find My” temporarily if using iCloud activation lock. After resetting, immediately retest Voice Memos. If audio works, re-enable app permissions one by one. If issues persist, the reset failed to resolve deep software corruption – proceed to service checks.
Clean Microphones Without Causing Damage
Safe Debris Removal Protocol
Compressed air is effective only when used correctly. Power off your iPhone 16 completely. Hold the can perfectly upright (never tilt beyond 30 degrees) and spray 1-second bursts from 6+ inches away. Never use shop vacuums – their static electricity fries microphone circuits. For visible lint, use a wooden toothpick’s blunt end to gently dislodge fibers horizontally – pushing downward risks puncturing the internal mesh.
Critical Cleaning Mistakes to Avoid
- Metal objects: Paperclips or pins scratch protective coatings, causing permanent distortion.
- Liquid cleaners: Isopropyl alcohol or water seep into ports, corroding components.
- Blowing by mouth: Moisture from breath accelerates corrosion in mic grilles.
- Excessive force: One firm tap on the phone’s bottom edge (on a soft surface) can dislodge debris – never shake violently.
Recognize When to Visit Apple
Hardware Failure Red Flags
Seek professional service only after exhausting all steps above. Visit Apple if:
– All microphones fail tests: Silent in Voice Memos, Camera videos, and calls
– Physical trauma evidence: Dents near mic ports or water exposure (check charging port for red LCIs)
– Persistent static/crackling: Even after cleaning and resetting, indicating internal damage
Prepare for Apple Service Efficiently
Before booking Genius Bar:
1. Back up to iCloud (Settings > [your name] > iCloud > iCloud Backup)
2. Note your warranty status (Settings > General > About > Limited Warranty)
3. Record failed audio tests – Apple technicians prioritize documented issues
Start with Apple Support chat (in Support app) for remote diagnosis – many cases get resolved without in-store visits.
Prevent Future Microphone Failures
Daily Maintenance Habits
- Case selection: Use Apple’s official silicone case – third-party models often misalign with mic ports.
- Lint-proof storage: Avoid jeans pockets; store iPhone 16 face-up on desks to prevent bottom-mic clogging.
- Quarterly permission audits: Review Settings > Privacy & Security > Microphone for unused apps.
Strategic Cleaning Routine
Incorporate mic checks into your screen-cleaning ritual: weekly, use a dry microfiber cloth to wipe around ports. After beach trips or dusty environments, do a Voice Memos test immediately. For heavy users (podcasters, frequent callers), carry a mini compressed air can – but never store it in hot cars where propellant expands.
Your iPhone 16’s microphone system is engineered for resilience, but its tiny ports demand mindful maintenance. Remember: no “off” switch exists – what seems broken is usually debris or permissions. Start with physical checks, validate via Voice Memos, then tackle app permissions before resetting settings. By following this sequence, 95% of users restore full functionality in under 15 minutes. If hardware failure occurs, your meticulous documentation ensures Apple service resolves it swiftly. Keep this guide bookmarked – a quick 30-second Voice Memos test after case changes saves future headaches.