

Your iPhone 16 constantly broadcasts your digital location through your IP address every time you browse, stream, or check email. Whether you’re avoiding location-based pricing, accessing geo-restricted content from another country, or simply want to prevent advertisers from tracking your movements, masking your IP address is essential for modern privacy. This guide reveals every method available on your iPhone 16 to hide your IP address—from built-in Apple features to third-party solutions—with clear, step-by-step instructions that take less than five minutes to implement.
Why Your iPhone 16 IP Address Needs Protection
Your IP address functions like a digital return address for all internet traffic, revealing far more than most users realize. When your iPhone 16 connects to any network, websites and services can determine your approximate physical location, track your browsing habits across sessions, and even identify your internet service provider. This digital fingerprint follows you everywhere online, allowing advertisers to build detailed profiles of your interests and movements.
Critical IP exposure risks on iPhone 16:
– Location tracking within 10-50 mile accuracy
– Personalized pricing for travel and services
– Regional content restrictions based on geography
– Potential profiling by data brokers
The good news is your iPhone 16 contains multiple privacy layers that can effectively mask your visible IP address. By implementing even one of these methods, you’ll significantly reduce your digital footprint while maintaining full functionality of your device.
Activate Private Wi-Fi Address for Network Anonymity
This essential iOS feature generates unique, randomized identifiers for each Wi-Fi network, making your iPhone 16 significantly harder to track across different locations.
Complete Setup in 30 Seconds:
1. Open Settings → Wi-Fi
2. Tap the blue (i) icon next to your connected network
3. Toggle Private Wi-Fi Address to On
What changes immediately:
– Your iPhone 16 creates a new network identifier for this specific location
– Network administrators see a randomized address instead of your device’s actual identifier
– Each coffee shop, office, or home network gets its own unique address
– Your device automatically remembers these settings for future visits
Pro tip: When connecting to a new network and seeing the privacy warning, always tap Continue to activate this protection. This feature works silently in the background but provides crucial defense against location tracking across multiple Wi-Fi hotspots.
Enable Safari’s Built-In IP Protection
Apple’s browser includes powerful IP masking that prevents websites and advertisers from connecting your browsing activity to your real location.
Activate Maximum Protection:
1. Navigate to Settings → Safari
2. Scroll down to Hide IP Address
3. Select Trackers and Websites for complete privacy
Two protection levels explained:
– Trackers Only: Blocks advertising networks from linking your IP to browsing habits
– Trackers and Websites: Prevents all sites from seeing your actual IP address during Safari sessions
This protection applies exclusively to Safari browsing. Streaming apps, social media platforms, and other browsers still use your actual IP address, making this just one layer of your privacy strategy.
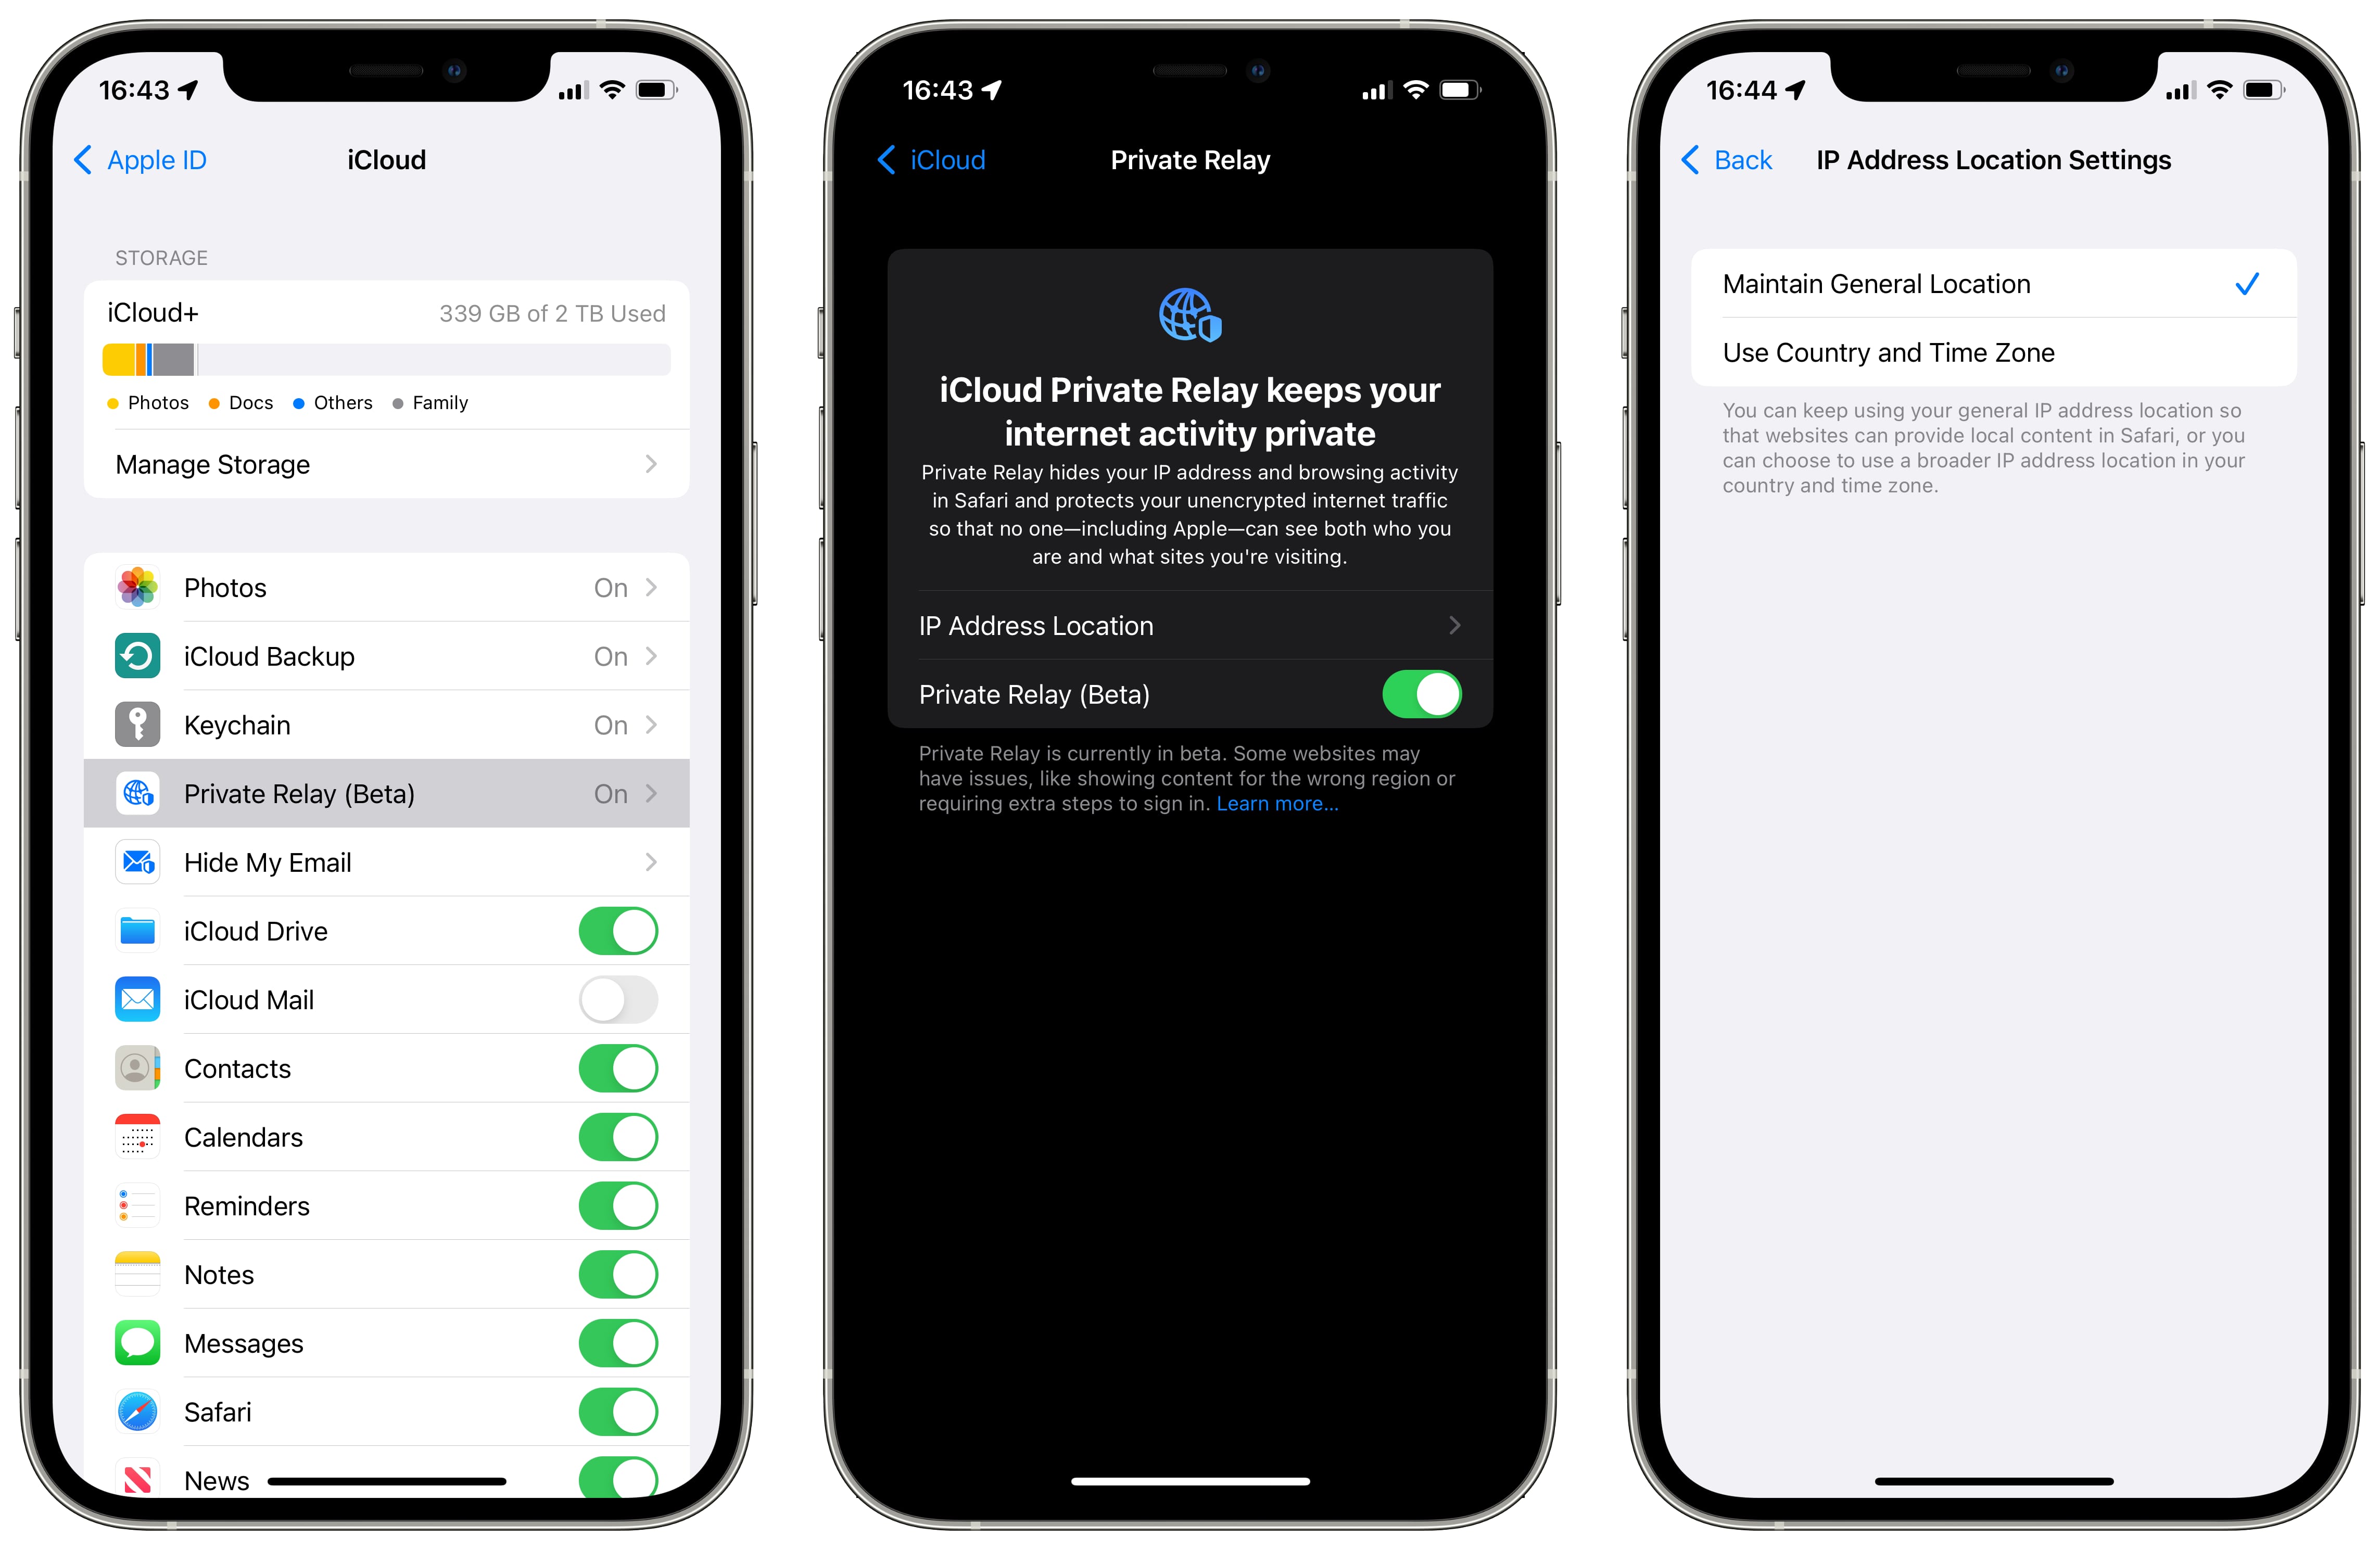
Configure iCloud Private Relay for System-Wide Protection
Apple’s premium privacy feature encrypts your entire internet connection and routes it through dual servers, effectively hiding your IP from websites, your internet provider, and potential snoopers.
Check eligibility first:
– iPhone 16 with iOS 15.2 or later
– Active iCloud+ subscription ($0.99/month minimum)
– Verified Apple ID
Enable in Four Taps:
1. Open Settings → [Your Name] → iCloud
2. Tap iCloud Private Relay
3. Toggle Private Relay to On
4. Select location preference: Maintain General Location or Use Country and Time Zone
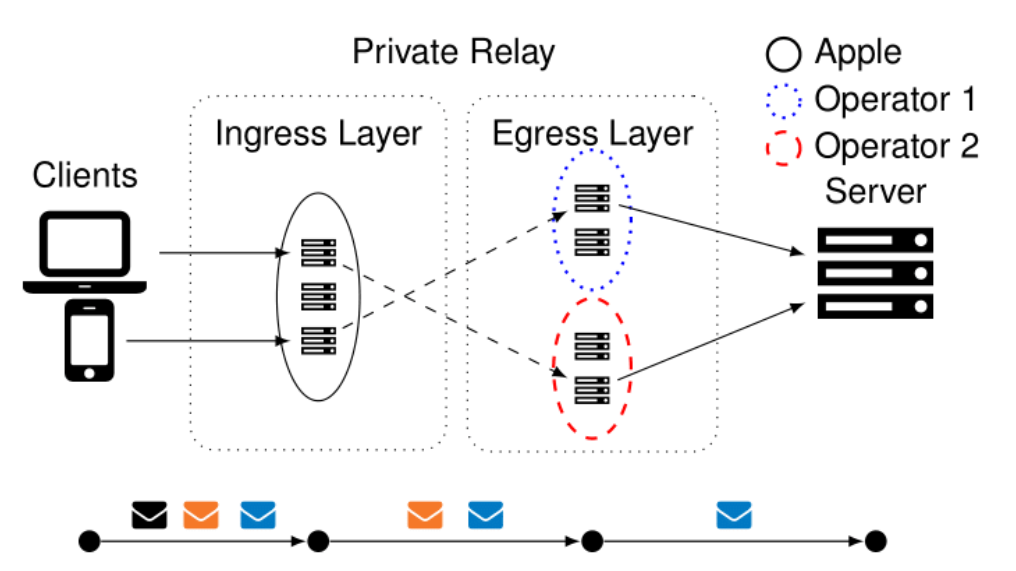
How Private Relay protects you:
– First Apple server encrypts your traffic and removes your IP
– Second independent server assigns a temporary IP address
– Neither server knows both your identity and destination
– Works across Safari, apps, and system services
Unlike standard VPNs, Private Relay maintains Apple’s strict no-logging policy while providing seamless integration with your iPhone 16 ecosystem.
Install a Trusted VPN Service for Complete Masking
For comprehensive IP hiding across all apps and services, a quality VPN remains the most effective solution, replacing your iPhone 16’s real IP address with one from any country.
Recommended App Store Providers:
– NordVPN: 5,400+ servers with specialty streaming servers
– ExpressVPN: 94 countries with fastest connection speeds
– PureVPN: Budget-friendly option with 78 server locations
Setup Process (2 Minutes):
1. Download your chosen VPN from the App Store
2. Open the app and create your account
3. Grant permission when prompted for VPN configuration
4. Select your desired server location
5. Tap Connect
Server selection strategy:
– Choose nearby countries for optimal speed
– Select specific nations to access regional content
– Use “Quick Connect” for automatic best server selection
Verify active protection: Check for the VPN icon in your status bar and confirm your new location at whatismyipaddress.com—your IP should now show the server’s country, not your actual location.
Activate Mail Privacy Protection Against Email Trackers
Marketing emails often contain invisible pixels that reveal your IP address and confirm when you’ve opened messages. Your iPhone 16 blocks these intrusions with one toggle.
Enable in Seconds:
1. Go to Settings → Mail
2. Tap Privacy Protection
3. Turn on Protect Mail Activity
This feature loads emails through Apple’s servers first, preventing senders from seeing your IP address, tracking your location, or confirming when you’ve read messages—critical protection against email-based profiling.
Cellular vs. Wi-Fi IP Management Strategies

Switching between network types naturally changes your visible IP address, offering basic location masking without additional tools.
Cellular advantages for privacy:
– Dynamic IP addresses that change frequently
– Less consistent location data compared to home Wi-Fi
– No permanent association with a physical address
Wi-Fi considerations:
– Home networks display consistent IP addresses
– Public hotspots reveal your location to network owners
– Office networks often monitor traffic patterns
Smart switching technique: For sensitive activities, briefly enable Airplane Mode then disable it to force your cellular provider to assign a new IP address—a quick method that takes just 10 seconds.
Layer Your Privacy Protection for Maximum Effectiveness
True IP anonymity requires combining multiple methods rather than relying on a single solution.
Recommended protection stack:
1. Always-on VPN for comprehensive traffic encryption
2. iCloud Private Relay for Apple service protection
3. Safari IP hiding for browser-specific defense
4. Private Wi-Fi Address on every network you join
5. Mail Privacy Protection for email security
Troubleshooting common issues:
– VPN disconnects: Enable “Connect on Demand” in VPN settings
– Website blocks: Switch to different server locations
– Speed drops: Choose geographically closer servers
– App conflicts: Some financial apps require temporary VPN disconnection
Privacy Myths That Put Your iPhone 16 at Risk
Myth: “Incognito mode hides my IP address”
Reality: Private browsing only prevents local history storage—your IP remains visible to websites and your internet provider.
Myth: “Free VPNs provide equal protection”
Reality: Most free services monetize your data through ads, tracking, or selling your browsing habits to third parties.
Myth: “Hiding my IP makes me completely anonymous”
Reality: Websites can still track you through cookies, browser fingerprinting, and account logins—even with a masked IP.
Essential Security Practices for iPhone 16 Users
Before implementing IP hiding:
– Verify your VPN provider maintains a strict no-logging policy
– Confirm iCloud Private Relay availability in your country
– Test IP masking using free online verification tools
Ongoing maintenance:
– Update your VPN app weekly for security patches
– Switch between VPN protocols if experiencing connection issues
– Monitor cellular data usage when using a VPN (may increase consumption)
Legal considerations: While IP masking is legal in most countries, some streaming services prohibit VPN use in their terms of service. Always comply with local regulations and service agreements.
Quick Privacy Activation Checklist
Immediate setup (under 2 minutes):
– [ ] Safari IP protection activated at Trackers and Websites level
– [ ] Private Wi-Fi Address enabled on current network
– [ ] Mail Privacy Protection turned on
– [ ] iCloud Private Relay configured if subscribed
Weekly verification:
– [ ] Confirm IP location matches your selected server
– [ ] Check for updates to your privacy apps
– [ ] Verify Private Relay subscription status
Your iPhone 16 offers unprecedented privacy tools that put you in control of your digital footprint. Start with Safari’s built-in protection today, then layer additional methods as needed for specific activities. Remember that no single solution provides complete anonymity, but combining these approaches creates significant barriers against unwanted tracking while maintaining your device’s full functionality. Implement at least one method now—your digital privacy shouldn’t wait.


